
I already mentioned the USB button we will be using to control the photobooth program on my sister's Mac here, and here I showed you all the fun props we got.
But as far as supplies other than the USB button, Mac and props, we're using the following to construct our fauxtobooth:
3 garment racks
3 queen size top sheets
Snaps (to hold the sheets on the racks)
2 clip lights
2 chairs (from our venue)
2 tables (also from our venue)
Large LCD computer monitor
High res webcam
1 small table for holding USB button
Wood box, with sister's laptop inside, LCD monitor on top (back of box is open for laptop fan circulation and cords)
3 signs
USB extension cord
Power extension cord
Double sided tape (for securing USB button to table)
Before doing the full mock up, I made this quick and dirty 'bird's eye view' diagram, so I would have a clear idea of where to set up everything (click for a larger view).

Now, I won't bore you with all the step by step photos I took (I'm guessing you all don't care to see how to assemble a garment rack, or the precise draping of the sheets on the racks), so I'll fast forward to the photos* with things more set up.
*Please use your imagination when looking at these rough mock up pictures. The real version with linen covered tables, nice chairs and non-wrinkled sheets is going to look a lot better, I promise! ;)
The quick and abbreviated set up instructions:
1) Assemble garment racks, adjust to head height, and drape sheets over the top.
2) Snap the snaps on the sheets, and form three sides of a square with the racks.
3) Place 2 dining room chairs in the booth (the actual chairs we'll be using are smaller than the ones in the picture, and don't have arms, so more people can cram together on them)
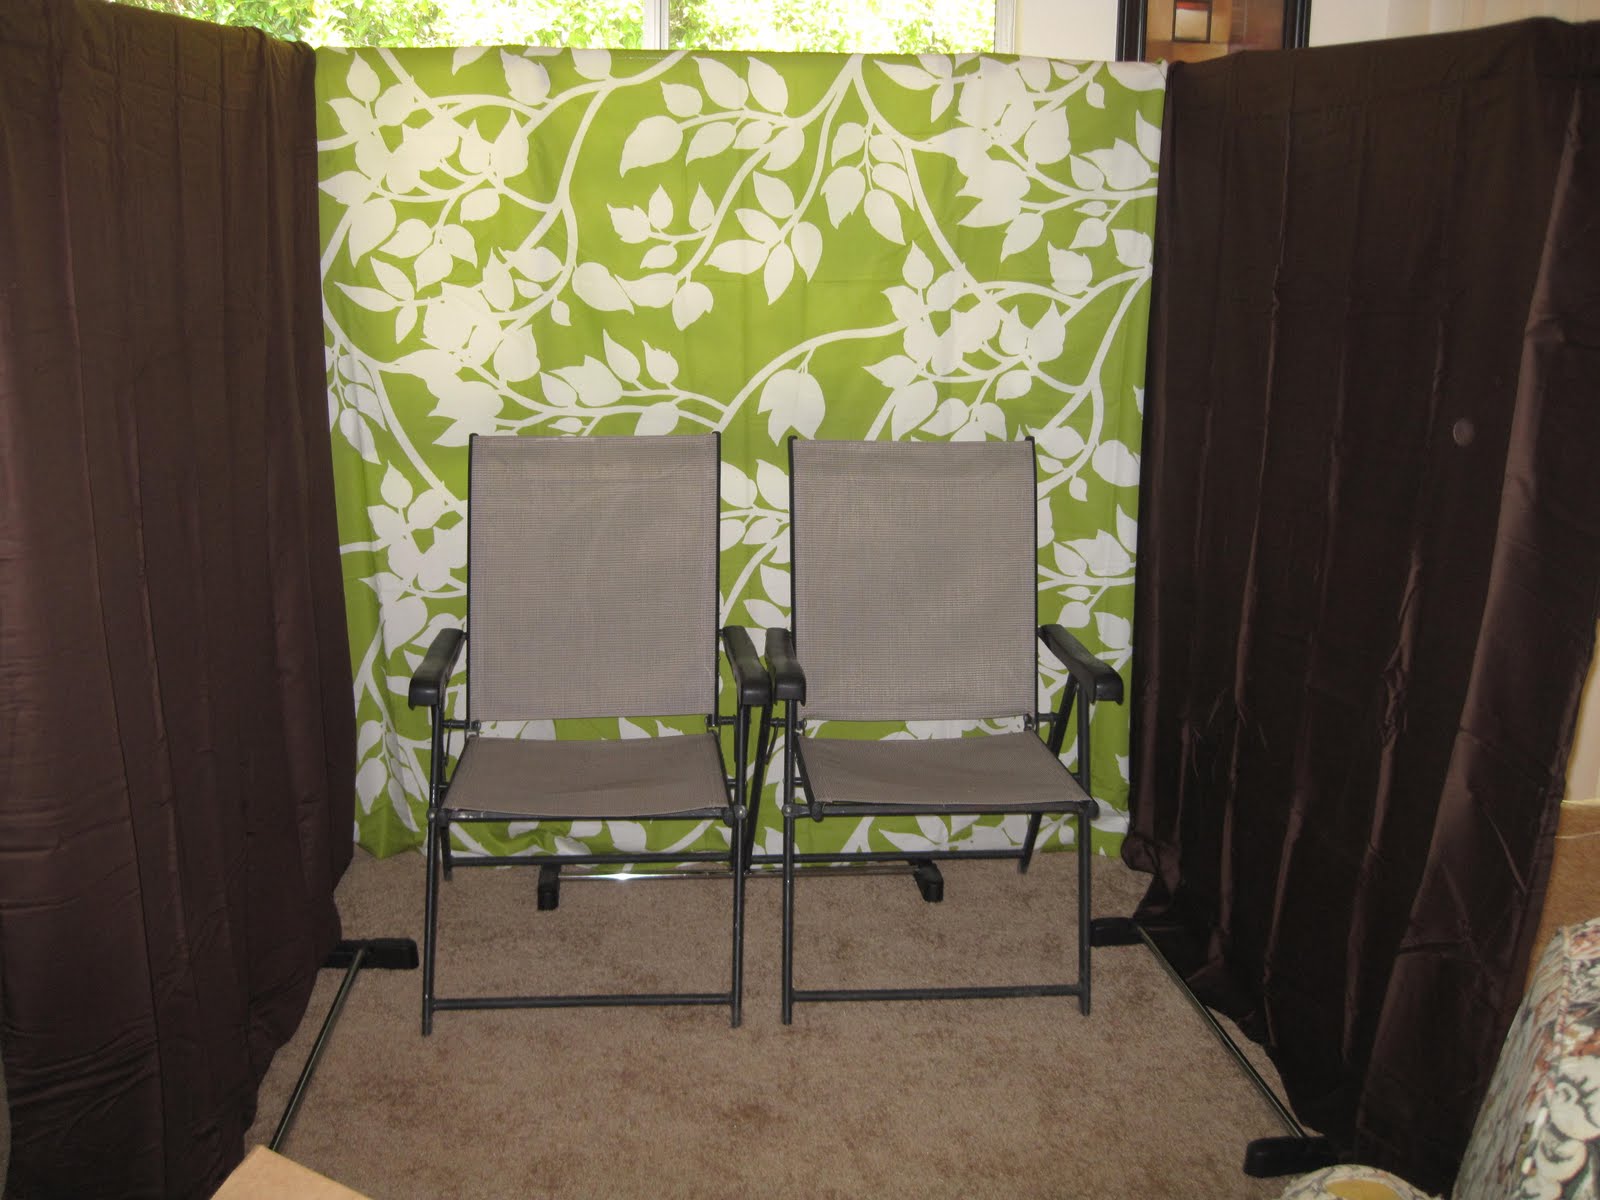
4) Place "Press button, smile, repeat" poster on table, facing the chairs, along with laptop, box over laptop, and LCD screen with high res webcam on top of box. Place "Photobooth" poster in front of table. (in the picture below, kindly imagine that the barstools are really a table with a nice table cloth on it)
5) Put the small round table right next to the chairs, with the button on top. Run the USB extension cable around the outside of the garment racks and up to the front table.
6) Clip the lights to the top of the racks, toward the front. Turn them to directly face the chairs, not pointing down. (The lights are not pictured below, and there won't be a window shining light through the sheets in our real set up.)


7) Lay out the props and prop sign on the side table. (We'll just pretend this box is a big table that covers the garment rack legs, ok? And that we have 10x as many props on the table.)


8) Adjust the webcam so that only the green back drop is in the frame of the pictures, and take some test pictures to make sure all is working correctly. (I obviously didn't follow step #8 in lining up my sample photos below, but on the day-of, the brown side sheets won't be showing)
 (I made 2 chalk board conversation bubbles with wood and chalk board spray paint. The lavender round table you see between the chairs is where the USB button will go, but I used my wireless mouse in this mock up. Also, in the real version, you won't see the garment rack legs through the sheets, it's only there in these pictures because I stupidly did my mock up in front of a window!)
Once I was finished playing in the fauxtobooth with my kitty, I packed everything away as compact as possible for transportation to our venue. Minus the LCD monitor, sister's laptop, webcam and the USB button itself, which I don't have at my house, all but the garment racks fit nicely into just two boxes.

I'm guessing that on our wedding day, it won't take my sister more than 15-20 minutes to get this all set up, especially with my (much more detailed than this post) set up instructions sheet.
We've included a note about our fauxtobooth in our programs and on our wedding website, and you can't miss seeing it on your way to the restrooms, or through the big windows from the deck/dining area, so hopefully our guests will put it to good use! The next day we'll upload all the photos to our site for everyone to download, and we also plan to print out some of the pictures of each guest on photo paper and include them with their thank you cards. It will be like getting another favor after the wedding is over!
Is anyone else jumping on the fauxtobooth bandwagon?


That is awesome! If we lived in the town where we’re having the wedding, my fiancé said he totally would have done something like this.
ReplyDeleteOMG, want this!!! I would have never come up with something like this and probably ended up wasting thousands of dollars to rent one. I love yours so much more than any rental I've seen. The green fabric is so fun.
ReplyDeleteAs usual, I am beyond impressed. Your wedding is going to be so much fun :)
Impressive. I love how it's enclosed so it's framed nicely. I'm trying to figure out hot to do this with printers for a friend....we'll see.
ReplyDeleteLove it! I went to a wedding a little while back that had a similar set up and people were having a blast with it. My husband and I have so many awesome pics from that day.
ReplyDeleteWhat a great way to share the printed versions of the shots with guests. You've gone to a lot of work to set this all up and to share it with blogland. You've saved future brides a lot of time as well..I'm going to share this post with my girlfriend! Thanks.
ReplyDelete