skip to main |
skip to sidebar
So I know my over-the-top flowered shoes aren't for everyone (but I love them, so that's what matters, right?). However, the ribbon roses my mom made for them could be used for a ton of other projects too! For bouquets, boutonnieres, on a dress sash, in your hair, grouped together to adorn pews... there are a lot of possibilities out there!
A while ago I searched the Weddingbee blog for a tutorial on ribbon flowers, but could only find clay and fabric flowers, so I asked my mom to take step by step pictures of her making the flowers.
Here are the instructions:
Cut the ribbon to desired length. We used 1-1/4 yards of 1-1/2” ribbon. For a smaller rose use 3/4 yards of 1/2” or 5/8” ribbon. Thread a needle with matching thread and knot the end. Fold down one corner on the ribbon and sew a few stitches. If you are using a ribbon with one “good” side, start with the “good” side down. Or you can use double sided satin ribbon, so both sides are "good."

Roll the ribbon five or six times and sew a few stitches to secure it. 
Fold the ribbon at about a 45 degree angle.
Roll the ribbon along the fold until the fold disappears.
Secure with a few stitches. Be sure the stitches secure all the layers. Stitches at just the bottom of the rose will not secure all the layers.

Fold again at 45 degree angle.
Roll again along the fold until the fold disappears.
Continue folding and rolling to the end of the ribbon. You can change the look of the rose by varying the angle and the tightness of your rolled rose.

Fold under the end of the ribbon and secure with stitches, and your flower is done.

The ribbon roses are now ready to decorate with!

You might also find this YouTube video helpful if you're planning to make ribbon flowers yourself.
Now, on with the actual making of the ankle cuff on the shoes. You could definitely do something similar if you wanted to spice up inexpensive ankle strap shoes, or even use feathers, or ruffles, or some crystal bling. There's so many ways you could decorate your own custom cuffs to make a statement on your wedding day!
I ended up using the purple Thai silk shoes I bought last summer as the base, and I believe they were about $36 from FlyJane. What was great about them was that not only were they a perfect shade of purple and inexpensive, I know they'll be relatively comfortable on our wedding day because I've worn them to work several times already.
This is what they looked like before any alterations:
 {Source}
To make the ankle cuff, hold your cuff material up (we used grosgrain ribbon because it is pretty sturdy) to your shoe, so one end is lined up with the clasp of the shoe strap. Cut the ribbon off at the other end, right before the hole you would put the clasp through. Do this twice, so you have two lengths of ribbon that are the correct length for wrapping around the ankle of your heels.
One of the strips of ribbon will go around the outside of the strap, as shown in this picture.

For the inside piece of ribbon, hold it up to the inside of your ankle strap, and make marks where the strap connects to the back of the heel. You will then sew button holes on the inner ribbon, where you made your marks.
After your ribbon is cut to the right length, and button holes are sewn in the inside layer, sew both layers of ribbon together with two rows of stitches, leaving a "pocket" in the middle where you will thread the strap of your shoes through. Depending on the width of ribbon you used, you may also want to stitch together the ribbon at the outer edges as well. Then you're ready to put the ankle cuff base on your shoes and decorate it!
Here is a look at the inside of the ankle cuff on my shoes, you can see where the button holes are on the inside layer of ribbon, and where the ends come out of the cuff at the strap clasp and strap end. As you can see, since the ankle cuff isn't sewn to the strap, it's not hard to remove it to change the shoes to a more casual look.


So there you go, that's the end of the tutorial!
But before I conclude my posts about shoes, I wanted to quickly address something.
Fashion and shoes are a very subjective topics, often times you either love or hate something. So the negative comments on my last post didn't bother me; people are allowed to have their own opinions and criticisms (even if they weren't solicited for them).
But one thing that did disappoint me was that some people didn't read what I'd written, and felt the need to criticize the look of my shoes with the dress I was wearing in the photos I posted. Even though I clearly stated in the post that it was my After Party dress.
To reassure you all, I will be wearing these shoes with my wedding gown, not that dress, so it really doesn't matter what the two looked like together! I simply included pictures of me wearing the shoes because I knew if I didn't someone would ask for them, and I thought it would be nice to show off another dress at the same time, since I don't have my wedding dress at my house.
So for those of you who were concerned that the thick ankle cuff shoes didn't work with a knee length dress (duh), here is a better representation of how the shoes will look on my wedding day, with a long dress (this isn't my actual wedding dress, but you get the idea).

And at the risk of getting more critical comments (Hey, it's ok, I feel like my shoes walked the red carpet and Joan Rivers bashed them but everyone else praised them. And I know if I had DIY'd shoes after the fab feathered Loubs, someone would have told me it looked like I kicked an ostrich or something!), here is a photo of the shoes up close on my foot, as requested by Miss Chirpie. (Sorry for the awkward angles in the last three pictures. It's hard to shoot shoes while they're on your feet! Also, unless otherwise noted, all photos in this post were taken by my mom or I.)
Have you made any flowers for your wedding, out of fabric, clay, ribbon, tissue paper or another material?
Alright, I know it wasn't very nice of me to tease you by not showing you my DIY wedding shoes in my last post, but I wanted to build up to the big reveal! :)
And I think I'm going to do things a little differently with this DIY reveal, usually I like to show the 'how to' steps first, and then show the final product, but I think it will make a little more sense to show off the fabulous shoes first, and then do a follow up on how to make them. Sound good?
Ok then! So, to answer my own question from the last post, I was inspired by a combo of the Viktor & Rolf shoes with the fabric flowers all over the shoes, and the Nina shoes, with the big flower on the ankle of the shoe. After looking at them more and more, I sent a picture of the shoes to my mom and sister, in an e-mail titled something like "Am I crazy, or could I make something like this myself?" And so I did, with a lot of help from my mom.
Here they are, my ribbon flower wedding shoes!


Eeeeeeeeee! I'm so in love with them! They are so unique and purple and flowery and gorgeous!
Want to see what they look like on me? I took some pictures with the webcam on my computer this weekend for you. (And also found out that my rehearsal dinner dress and after party dress I bought last fall are sadly too big now. So I'll only show the pics of the after party dress because it has a sash that I could just tie tighter and cinch it in, so it looks alright. The rehearsal dinner dress needs some alterations, or maybe I'll get a sash for it too, but right now it's not fitting well enough to show you--I can take it off without even unzipping it! Guess there are downsides to dieting too!)


And while we're here, let's have a closer look at the ribbon flowers. My mom made all of these by hand, 23 on each shoe! In my next post I'll do a tutorial on how to make them, and how we attached them to the shoe (the ankle cuff of flowers is actually removable!).


Ahhhhh! I've been waiting so long to show you these, since it was late February when I actually decided to do DIY shoes. But like many DIY projects, they took a long time to complete! However, all the time spent (read: all the time my mom spent) was SO worth it, because these shoes meet my criteria of purple, jaw-dropping, amazing, “OMG I’ve never seen such unique shoes” just perfectly!
Would you consider DIY'ing decorations for shoes if you couldn't find the perfect wedding shoes to buy?
(all pictures in this post were taken by me)
I know, I know, it's been a while since I've written about shoes. I sort of left you all hanging after describing just how obsessed with shoes I am, and then my dilemma about the perfect shoes that weren't.
You all were so amazingly helpful in convincing me to not wear shoes that were too big and possibly ruining them by changing their color. And you guys sent me some amazing shoe possibilities too, which I really appreciated!
After my last post, I continued my hunt for the perfect shoes, looking into some of the ones the hive sent me, and also looking at some more expensive designer shoes.
In the meantime, my mom e-mailed me this funny story, about just how early my shoe obsession began:
"When you were about 18 months old, you and your dad went with me to shop for shoes. You were in your stroller and you were fascinated with all the shoes. After we crisscrossed the mall, going to several shoe stores, we looked down and you were holding a bright pink high heeled pump. After checking, we determined that the pump wasn't sold in that store. We backtracked until we finally found the right store. Quietly, we replaced the shoe on the rack and quickly exited the store. Thus, your obsession with shoes began and has grown over the past 25 years."
See? Even as a baby, I loved awesome heels! :)
So, I continued on with my search for the most perfect, jaw-dropping, amazing, "OMG I've never seen such unique shoes" in purple. Here's a look at some of my considerations, that were close, but not quite perfect, for one reason or another.
Brian Atwood heels, loved the color, but not available in my size. Would have been alright, but not "wow," if I could have had shoe clips made to match my jewelry:
Nina heels, that were pretty, but not quite right:
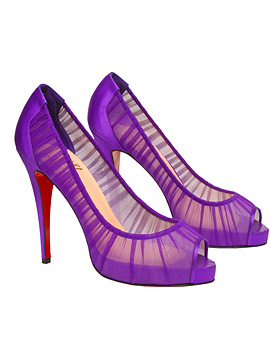
Giuseppe Zanotti shoes, no longer available in the three tone purple color (but I have seen them available in white that could be dyed):

I liked these Loubs, but could only find fake versions of them online, and I didn't want to spend a couple hundred dollars on something that wasn't even legit!
Same with these other Christian Louboutin shoes, I could only find the knock offs, and also, the metallic lilac color probably was too silver to go with my gold dress anyway:
I liked these Manolos alright, but a lot of brides have worn them already, and again, only fakes available in purple:

These Viktor & Rolf shoes were pretty awesome, but not purple. Nor could I find them available anywhere:
These Loubs posted by Miss Damask on the boards were getting closer to the "OMG WOW" look I was going for....but again, not available, and not 100% perfect. But close, so very close, if only I was a feathers kind of girl!

I liked the romantic feel to these Valentino heels, but they weren't purple, and $1250 was a bit steep:
And I almost loved these, but I'm not sure patent leather was right for my taffeta dress....plus there's that pesky availability and price issue.

So after obsessively looking online for about another hundred hours, dreaming about running after the perfect shoes but never catching them, and pretty much just pulling out my hair, it occurred to me: why not just DIY my own shoes?
That had been my original idea, to DIY shoes after the ones I ended up getting (the ones that turned out not purple and too big). So why not move ahead with the DIY--after all, I've DIY'd almost everything else for our wedding!
So I ended up designing my own shoes (in Photoshop, of course!), using one of the shoes in this post as my inspiration! Can you guess which ones?
Let me give you a hint.....we bought a LOT of purple ribbon from an amazing 4 story fabric store in San Francisco.


Now that my shoe obsession has been properly established, you can fully appreciate the story of how I found the perfect wedding shoes that weren't.
Upon getting engaged last March, the shoe search began. Around the same time I also began looking for wedding inspiration pictures, and looked at everything tagged "purple" on TheKnot.com. This was how I first found these gorgeous purple and champagne beaded heels. The end all, be all shoes. The. Must. Have. Most perfect shoes ever!

{Source}
I was head over heels (pun intended!) in love with these shoes. And let me tell you, I spent months and months trying to find them. I set up Google and eBay alerts, using any and all search terms I could think of. I scowered the internet looking everywhere. I think I spent probably 100 hours altogether trying to find these or similar shoes, without any luck.
By the end of last summer, I'd all about given up hope. I didn't think I would ever find the perfect, magical shoes, and started looking for other options. I even went so far as to try to imitate the shoes, like in this PhotoShop mock up I did on random purple shoes I found on Zappos:

I bought some inexpensive purple heels and some lace appliques, intending to try to duplicate the shoes (with the flower on the toe removed), but later decided it was a fool's errand; they were never going to look as good.


Another month or so passed. I found and placed the order for my wedding dress. I continued to search for an alternate pair of dreamy purple heels, but time and time again went back to the picture of the beaded ones on The Knot.
Finally, in mid October, genius struck (or crazy internet stalkerness struck, whatever you want to call it)! It occurred to me to e-mail the photographer of the shoes, to see if he had any idea where they were from. He, of course, did not (and probably thought I was an insane bride for asking...uh, yeah, I am! Why do you think I spent my entire last post establishing how much I love shoes?). But I then thought to Google the bride's name, and that's where I hit pay dirt!
It turns out, the bride works for her family's photography business, which was about the third Google result. I quickly filled out the company's Contact Us form on their website, saying that I knew it was a long shot, but did anyone have any idea where the featured shoes were from? And guess what? Her mom responded, saying they were actually the bridesmaid shoes, not the bride's, and her other daughter just happened to still have the shoes in her closet, and would be happy to sell them to me!!! This bride's mother didn't even think I was silly for contacting her and was very happy to find a home for the shoes.
I was so insanely happy that I seriously thought I might die! Who cared if the shoes were a size and a half too big? Padded inserts and the ankle strap would make it work! They were in the mail and on their way and I HAD THE PERFECT WEDDING SHOES!
 {Source}That was, until I actually received the box in the mail and opened them and.....they were not purple! I was completely crushed. My heart was torn out and stomped on and pierced with the stiletto heel of these shoes. My mom had always said that the picture of the shoes didn't look purple on her computer screen, but on my home laptop and both monitors at my work, they were definitely, undeniably purple in the picture. And, I'd found them by looking at purple tagged wedding pictures on The Knot.
So, want to see what they really look like? They are still very pretty, but not purple! More of a bronze/green shade, with bronze beads.


And a side by side comparison of the actual color and the pro photo color:

I was seriously crushed, but my mom suggested I wait until after my wedding dress came in in mid February, and decide what to do once I could see the dress in the gold color I ordered. In the meantime, I considered using fabric pens to turn the shoes purple, which I tested on some scrap fabric.


The fabric pen in the last picture above worked the best, but it is quite dark, and might just blend in and make the shoes a darker color of green/bronze/purple. And the beading would still be bronze. :(
So I'm pretty much at a loss, and I need the hive's help. These are really pretty shoes the way they are, and they do go with my gold dress, which I finally just got to pick up (but still need alterations). But it just breaks my heart to not get to wear purple heels on my wedding day, and plus, the shoes really are way too big. And if I try to change the color of the shoes, I'm afraid I might just ruin them forever, which would be a shame too.
So please help me! What should I do?
A) Just wear the beaded heels as is, even though they're not purple and 1 1/2 sizes too big
B) Attempt to make the heels purple, and maybe end up ruining them
C) Find a different pair of purple heels to wear on my wedding day, and after the wedding, sell the beaded ones to someone who they will fit and who will love them as is
D) Some other solution that I'm obviously not thinking of because I'm admittedly way too obsessed with shoes (please specify in the comments)


 {Source}


 (Sorry for the awkward angles in the last three pictures. It's hard to shoot shoes while they're on your feet! Also, unless otherwise noted, all photos in this post were taken by my mom or I.)


