
And of course, with all the many crafty projects for our wedding, I thought, "sure, no problem, a DIY veil, easy-peasy!"
Uh, yeah. There's a reason why veils are so expensive. They're HARD to embellish!
If I'd wanted a plain tulle veil it would have been much easier. Or even a ribbon or crystal trimmed one. But oh no, not me, I wanted an embroidered veil!
So. Here's the details on how we made a two layer embroidered fingertip length veil. There are already a lot of great posts out there on the veil construction itself, so I won't touch too much on that, but focus more on the preparation for the embroidering.
And by the way, this final product was about attempt 7 on this project, which is why it only got finished a few days before the wedding. That's because tulle is flimsy and rips easily, so it needs a stabilizer to make it stiff enough to be embroidered; an embroidery ring just didn't work. We ended up using a water soluble stabilizer to stiffen the tulle and washed out the stabilizer after the embroidery was complete.
Start by laying the fabric out and marking the outline of the veil. Spread out the tulle, and using a string held in the center of the fabric and permanent marker, trace around the outline of the veil, so you get an evenly spaced line. Be very careful not to tear the tulle while marking. Mark the outline slightly larger than the finished veil size; the mark will be cut off when finishing the veil.

Cut Ultra Solvy into small pieces and dissolve it in a small amount of water in a baking pan or bowl. We dissolved 18” of Ultra Solvy in about a cup of water. It takes a LOT of stirring to dissolve (as in, like 45 minutes of stirring). If the Ultra Solvy doesn’t dissolve, heat the mixture in the oven to 200 degrees and then stir some more.

Prepare a flat, smooth surface for working with the Solvy. We used plastic sheeting laid out on an old counter.

Spread the Solvy mixture over the area of the veil to be embroidered. My veil was embroidered mainly on the edge, so we spread about 6” of Solvy just inside the outline mark. Let the Solvy dry completely. Gently pull the veil off the work surface. Be very careful when pulling up the tulle or it will rip and you'll have to start over!

Embroider the veil with whatever design you like (or whatever design you can get to look halfway decent on the tulle. Some experimenting is VERY necessary before you start sewing on the actual veil itself!), using an embroidery sewing machine. We borrowed this one from my aunt who helped with my dress alterations. Or you could always embroider it by hand, if you have gobs of time. But I didn't even get to try my finished veil on until the Thursday before the wedding, so I obviously had no extra time for that! Sew only on the areas coated with Solvy.


Trim the outside edge of the veil, cutting off the outline mark you made with the permanent marker. I had a scalloped edge on my veil.

Next, gently wash the Solvy out of the veil by soaking it in water.

We then further embellished my veil by gluing small pearl beads on the embroidery. You could also use sequins or crystals if you wanted some extra bling.

Finally, to complete the veil, gather it at the top using a whipstitch and attach it to a comb or clips. I hated the way combs messed up my hair when trying on veils at bridal salons, so insisted on using clips instead. If you're only planning to wear your veil for part of your wedding day, I recommend experimenting with different combs and clips when you do your hair trial, to find the best option for not messing up your hairstyle when you take the veil off.

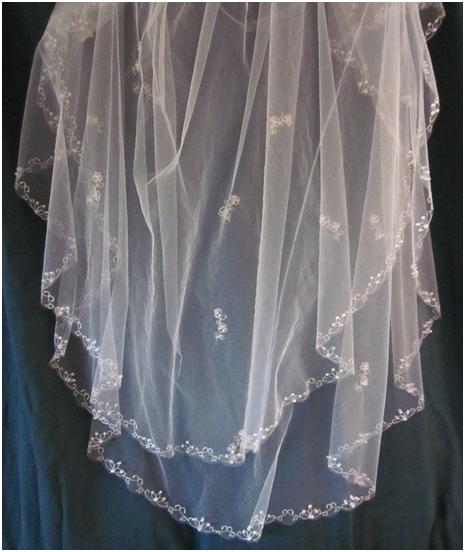
And the final product!
I don't have any detailed pictures of me wearing it on our wedding day yet, but I know our pro pictures will be ready soon!
If you're wearing one, did you DIY or buy your veil? And were you shocked when you first learned just how expensive veils really are?


Wow that looks great, so impressed you did it yourself!
ReplyDeleteI bought mine and yes it was fairly expensive; think I paid £110 which i guess is around $160 and it had no detail and was just 1 layer; but it was really long, went even further than my dress train which was also long! I took mine out at dinner though and thankfully my hair still looked fine afterwards!
It looks beautiful, and I can't wait to see the photos of you wearing it at your wedding. I would never attempt to DIY may veil, so way to go!
ReplyDeleteYour veil was gorgeous! I can't believe you made it yourself. Thank goodness there are some reasonably-priced birdcage veils on etsy - I agree that veils can be really pricey!!! This is a great alternative if you have time for a time-intensive DIY.
ReplyDeleteI can't believe how expensive veils are! I made my own, but nothing compared to yours! You rock!
ReplyDeleteWow. I'm really impressed! It came out great. I'm still on the fence on whether or not I'm going to wear a veil. If I get one, my mom might make it since she sews, or I'll check out Etsy.
ReplyDeleteOh my gosh it's GORGEOUS! I never would have been able to pull something like that off. You are far handier with a sewing machine than I could ever be.
ReplyDeleteIt's definitely more beautiful than any I ever saw while dress shopping!
my jaw just fell to the floor!!!!! That is a ton of work!!!! you are amazing!!!!!
ReplyDeleteI originally was thinking I could do my own veil.....until I checked out the detail involved.....and i graciously handed over the credit card. You're now my idol!
I will be honest...I didn't read half this post because I suck at this kind of stuff and had no desire to make anything like that at all. But I will say that you again outdid yourself and it is fan-freakin-tastic! It's so beautiful...I really don't know how you do it. You have a heck of a lot more patience than I ever could have.
ReplyDeleteI went the easy-peesy route and asked a friend if I could use her veil from her wedding 2 years earlier as my something borrowed...she was honored, it matched perfectly and I didn't have the problems of shopping, paying or stressing about the veil.