skip to main |
skip to sidebar
Now that we discussed how to pee in your wedding dress, lets talk about a minor regret I have about our wedding: we didn't do a signature drink. We just couldn't think of a really special drink, and it got pushed to the wayside for more important projects. But oh, if only we had found out about this sooner in the planning process!
One of my bridesmaids gifted me something amazing a couple of days before our wedding--edible hibiscus flowers from Australia.
 These little flowers taste amazing, sort of like candied raspberry rhubarb, and look so cool in the bottom of a drink! Even better, if you put one of the flowers in champagne, along with a little of the syrup, the bubbles in the champagne actually make the flower open up more, for the perfect, edible garnish!If only I would have found out about these sooner, I would have totally had Wild Hibiscus Champagne waiting on trays as soon as our ceremony ended. You can buy jars with 50 flowers for $35 online here.The side of the jar also has a bunch of recipes for other cocktails featuring the flowers, which of course I had to try. Luckily I had everything needed for a Wild Hibiscus Daiquiri on hand.
 The result? Serious yummage, and one of the most unique garnishes I've ever come across. It kind of reminds me of across between a jellyfish and Seymour from Little Shop of Horrors.


 (all pictures in this post are personal photos)
Alright, time to lay down some wedding day wisdom! Regarding peeing!I know this is something we’ve all thought about, or will have to think about. How the heck do you use the restroom in a wedding dress? It’s not easy, no matter how you look at it, that’s for sure. Especially if you have a dress with lots of material and poof, like an A-line or ball gown.After purchasing my dress back in October, I looked on the Weddingbee boards and Googled for advice on how exactly to go about doing this. There was no way I was gonna hold it all night, and the ridonk rumor about bridal diapers wasn’t something I’d ever consider! But I basically found the same advice over and over, to get help from one of your bridesmaids.Would you like to see a little illustration on the recommended way of peeing in a wedding gown, and the different way I found to work better? Thought so!(And yeah, even though I’m a pretty dedicated blogger, I didn’t have someone take pictures of me in the bathroom so I could blog about it. You’ll have to make do with my lame line drawings. Apparently I’m pretty good at Photoshop, but not so much when it comes to actually drawing something in Illustrator!)First, grab your MOH and enter the handicapped stall in the bathroom together. Facing away from the toilet, have your MOH lift up your dress from behind.
 Back toward the toilet, with your MOH standing behind you, squished up next to one side of the toilet.
 Sit down, with her holding your dress up over the back of the toilet.
 Ok, so I had a lot of problems with this recommended way of relieving yourself. First, I’m not a big fan of doing my business in front of people. We definitely have a “closed door” policy in our house! Plus, holding your dress up above your head could easily pull out your bustle, or potentially mess up your hair if the dress bumps into the back of your head. Not to mention the fact that you’ll have to interrupt the fun that your MOH or bridesmaid is having at your reception, and drag them off the dance floor to attend to your bladder’s needs.So I thought I’d share the way I peed at my party with you all, because I found it a lot easier to pull off!First, enter the handicapped stall by yourself.
 Approach the toilet, facing the toilet, and pull up the front of your dress.
 Take off your panties so they are either only on one leg, or you can take them off altogether.
 Straddle the toilet, continuing to hold the front of your dress up. Get rid of all that champagne you’ve been drinking all night! ;)
 And….that’s it! SO much easier than the two person alternative, and as a bonus, some alone time. In fact, this was the only time I had to myself our entire wedding day (the bathroom was empty except for me), and I relished the couple of minutes by myself, not having to talk to people!So tell me, have you given this much though yet? Which way will you be peeing while wearing your wedding dress?
For those of you who read this blog in Google Reader, and can't see my sidebar, I wanted to let you all know that I have a new blog! The Handcrafted Life will be where I will share my life as a newlywed, and once I've finished my recaps on this blog, I will move entirely over to this new site.So far I've only got a few posts up, but I hope to start sharing some upcoming projects around our house, with a dash of my attempts to learn to cook, and maybe some travel planning and randomness thrown in. It's actually very refreshing to not write exclusively about weddings!I hope you'll stop by The Handcrafted Life when you get a chance and subscribe. Leave me a comment with a link to your blog too, since I'm looking for newlywed blogs to add to my reader, and I definitely want to stay in touch with all my wedding blogger friends once your weddings are over too!
As many of you know, veils are freakin' expensive. For just a little piece of tulle! I know when I was dress shopping, and the sales clerks would shove a veil on my head, I would flip out about the $150+ price.
And of course, with all the many crafty projects for our wedding, I thought, "sure, no problem, a DIY veil, easy-peasy!"
Uh, yeah. There's a reason why veils are so expensive. They're HARD to embellish!
If I'd wanted a plain tulle veil it would have been much easier. Or even a ribbon or crystal trimmed one. But oh no, not me, I wanted an embroidered veil!
So. Here's the details on how we made a two layer embroidered fingertip length veil. There are already a lot of great posts out there on the veil construction itself, so I won't touch too much on that, but focus more on the preparation for the embroidering.
And by the way, this final product was about attempt 7 on this project, which is why it only got finished a few days before the wedding. That's because tulle is flimsy and rips easily, so it needs a stabilizer to make it stiff enough to be embroidered; an embroidery ring just didn't work. We ended up using a water soluble stabilizer to stiffen the tulle and washed out the stabilizer after the embroidery was complete.
Start by laying the fabric out and marking the outline of the veil. Spread out the tulle, and using a string held in the center of the fabric and permanent marker, trace around the outline of the veil, so you get an evenly spaced line. Be very careful not to tear the tulle while marking. Mark the outline slightly larger than the finished veil size; the mark will be cut off when finishing the veil.

Cut Ultra Solvy into small pieces and dissolve it in a small amount of water in a baking pan or bowl. We dissolved 18” of Ultra Solvy in about a cup of water. It takes a LOT of stirring to dissolve (as in, like 45 minutes of stirring). If the Ultra Solvy doesn’t dissolve, heat the mixture in the oven to 200 degrees and then stir some more.

Prepare a flat, smooth surface for working with the Solvy. We used plastic sheeting laid out on an old counter.

Spread the Solvy mixture over the area of the veil to be embroidered. My veil was embroidered mainly on the edge, so we spread about 6” of Solvy just inside the outline mark. Let the Solvy dry completely. Gently pull the veil off the work surface. Be very careful when pulling up the tulle or it will rip and you'll have to start over!

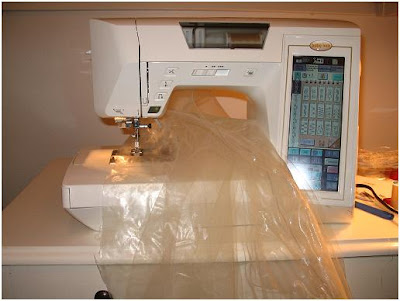
Embroider the veil with whatever design you like (or whatever design you can get to look halfway decent on the tulle. Some experimenting is VERY necessary before you start sewing on the actual veil itself!), using an embroidery sewing machine. We borrowed this one from my aunt who helped with my dress alterations. Or you could always embroider it by hand, if you have gobs of time. But I didn't even get to try my finished veil on until the Thursday before the wedding, so I obviously had no extra time for that! Sew only on the areas coated with Solvy.

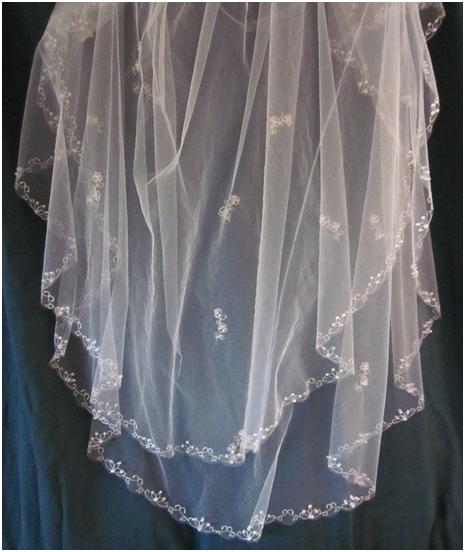
Trim the outside edge of the veil, cutting off the outline mark you made with the permanent marker. I had a scalloped edge on my veil.

Next, gently wash the Solvy out of the veil by soaking it in water.

We then further embellished my veil by gluing small pearl beads on the embroidery. You could also use sequins or crystals if you wanted some extra bling.

Finally, to complete the veil, gather it at the top using a whipstitch and attach it to a comb or clips. I hated the way combs messed up my hair when trying on veils at bridal salons, so insisted on using clips instead. If you're only planning to wear your veil for part of your wedding day, I recommend experimenting with different combs and clips when you do your hair trial, to find the best option for not messing up your hairstyle when you take the veil off.

And the final product!

I don't have any detailed pictures of me wearing it on our wedding day yet, but I know our pro pictures will be ready soon!
If you're wearing one, did you DIY or buy your veil? And were you shocked when you first learned just how expensive veils really are?
Well hi there! And happy Monday, JULY TWELVTH! Yep, that’s right, today is our one month anniversary of getting MARRIED!
And we’re loving it!
So many people have asked us things like “Does it feel different being married?” or “Has anything changed since tying the knot?” And my answer is yes and no.
I’ve written several times about the fact that Mr. Cola is my best friend, how we’ve known each other for 10 years, been dating over 7 years, and have lived together for longer than we’ve dated (we were friends and roommates first). So on one hand, nothing very significant has changed on the home front; we didn’t move in together for the first time, we didn’t get a new house, and we aren’t adjusting to each others quirks. On this end of things, the only thing different was we came home from our honeymoon to a mostly clean house for a change. And it’s managed to stay pretty clean, because I’ve been taking a break from messy DIY projects (although that’s about to change, we need to get on our thank you cards!).
 (photo from our webcam fauxtobooth)
But even in our everyday, boring lives, things DO seem a little different. Better. More full of love. It’s hard to explain, really, but sort of like….all the little things Mr. Cola and I do together now, like going grocery shopping or deciding what to do this weekend is….richer. We’ve been partners in life for a very, very long time, but now, it’s an even stronger bond. I didn’t really think much would change after our wedding, and for the most part it hasn’t, but in small and unexpected places, like a glance I’ll get from Mr. C, or him getting me something to drink while he’s up without me even asking, I feel even more loved than ever, and more love for my *husband* than I’d ever thought possible.
Or maybe it’s just the sexy glint off his wedding band that I keep seeing! ;)
All joking aside, we do have some changes coming our way. I’ll have to go through the PITA name change process sooner or later, but so far all I’ve done is change my signature line on my work emails. We’ll get a joint savings account, and make a budget plan for our future goal of buying a house (not an easy goal to reach in the Bay Area!). Together we will set forth to accomplish the goals we’ve been talking about for years, and while I’m sure it won’t be easy, I’m so looking forward to our life, and our future, together. As old married folks! (and I'm also SO looking forward to sharing our wedding day recaps with you very soon!)
 (guest photo)
What changes do you think will happen after your wedding, or newlyweds, has much changed? And happy 1 month anniversary to all the other June 12th brides out there!


 (all pictures in this post are personal photos)






 Posts
Posts