skip to main |
skip to sidebar
Alright, I admit it, I'm a PhotoShop dork. I taught myself how to use it about 5 years ago for a job, and have been obsessed ever since! It really helps me visualize my projects to lay them out in two dimensions, and will (hopefully!) serve as a blueprint for my DOC (when I pick one) to set up everything as I envision. I will be doing real life mock ups of most of these, which I will share with you over the next few months, but in the meantime I wanted to show you all some of my PhotoShop designs, to give you a little preview of what to expect. (I know, I'm such a tease!)
Sample invitations suite mock up (note, some of this will be changing, but gives you a good idea of my color scheme. I will definitely be using the stylized flower and vine with flowers motif throughout):
A closer look at our STD magnets, which will accompany our insanely excessive STD cards (more on those later!):

A mock up of potential program design:
Place cards mock up:

I even PhotoShopped on the floor plan on TMT's website, where I want everything to go:

And then I PhotoShopped furniture and an arch similar to what we'll be building onto a picture of TMT's ceremony location (don'tcha just love the view of the bay through the trees?):

Next up, a mock up of the dining tables looking down. I did this all to scale, with 60" tables and 13" chargers, to make sure the beautiful purple glass chargers I found would be worth the 88 mile drive to Sonoma to rent (my mom was very concerned the table would look to crowded, what do you think?): A close up of a single place setting & swatches:
And of course I had to do side views of the tables, so I could visualize the centerpieces (note, I did these before discovering the lovely purple chargers above). Here is the tall centerpiece:
And the short centerpiece: And the centerpiece for the cocktail tables:
 Next up, my four tier card box:
 And also favors mocked up (but we might be changing these to something else....):
And signage, lots of signage! These will be the buffet signs:

This is the sign that will explain our untraditional Wishing Stone guest book:

And this is a mock up of the Gift Table/Guest Book Table:

I also made cute bathroom door signs, to cover the ugly signs they currently have on the doors:

And then there was the matter of our crazy 6' tall cupcake stand that Mr. Cola will be making. I of course had to make sure 100 regular sized cupcakes and 200 mini cupcakes would fit on our stand, allowing for room at the corners of each shelf for flowers. Each big square below is a shelf of the cupcake stand, and circles are the cupcakes. Yep, they all will fit! (and no, I don't expect our baker to set them up EXACTLY this way, but they'll get the idea from this to stagger regular ones with minis):

And finally, I couldn't leave you without a peak at what I've mocked up for our rehearsal dinner. Since we're doing a casual BBQ in the park for all our family and out of town guests, I'm going with a Paisley Picnic theme. Here are the buffet signs:

The place card and sign explaining seats aren't assigned, but we're using place cards so everyone can learn each other's names:

And a birds-eye view of the rehearsal dinner picnic tables all decked out (but I'm thinking maybe using metal pails instead of the boot center pieces. And there will definitely be citronella candles!) Well, that's about it for now! Next step, start implementing these designs (and so many more that I haven't shared!) into real life mock ups and then the final products. I think it will be so interesting to look back at this post over the coming months, to see how many of these mock ups actually evolve into real elements of our wedding, and how many morph into something different.
Did you feel the need to PhotoShop mock ups of your wedding creations before implementing them in real life?
Ever wonder how rubber stamps are made? Well wonder no further, cause I'm gonna show you!
Mr. Cola is a partner and senior designer for his smart product design engineering firm (aka, really smart dude!). Because of this, we have access to lots of neat gadgets and machines that most of you probably have never even heard of before. Enter the magical laser cutter! This is about a $35k machine that cuts material in layers with a super hot laser. I have plans to use it for several projects, but for now, we've only used it to make rubber stamps.
I ordered 2 8.5x11 sheets of rubber from laserbits.com, for $9.98 each. We then went into Mr. Cola's office on a Saturday with my two designs and the rubber. I made one design that is the vine motif from the wedding party invites, and one with our address on it. These will be used to decorate our envelopes for our STDs and invites. When you make a design for a rubber stamp, you have to provide the inverse of the image you're trying to create, since you're actually cutting out the parts that won't be stamped.
So now, don'tcha wanna see the laser in action?
Where you see the white light is the laser cutting into the rubber, and not lit spots are where it leaves the rubber for the stamp:

The finished address stamp (excuse the edits for privacy):
 {All pics taken by me}
And here is a video of the laser cutter in action!
After all the exciting cutting was done, we mounted the rubber onto pieces of acrylic that Mr. Cola had lying around the shop. So my total cost was only for the rubber, and we still have about 3/4ths of it left for future projects!
Did you use any unusual gadgets or machines for your wedding DIY projects?
After selecting our venue and setting up our custom wedding website (more on that later), the next most important thing was asking our wedding party if, well, they'd be in our wedding party!
For Mr. Cola it was an easy choice, his brother would be his best man, and his 3 best friends from high school and college would be his groomsmen. Done, easy as pie.
However, considering that most of my friends are guys, and I'd had to disown my best girlfriend last January (long story), I was at first not looking forward to picking my girls. Obviously my sister would be my MOH, there was no question about that, but I didn't want to ask anyone to be a bridesmaid who I wasn't that close with, and make someone feel obligated because they were asked. So I ended up picking bridesmaid H, who I've become friends with over the past 3 years (and she's now conveniently married to one of the groomsmen!), and bridesmaid A, who is my future sister in law.
So we'll be having uneven numbers, with 4 on Mr. Cola's side and 3 on mine. But it wasn't a big deal to me, so I moved on to making the fun little "will you be in our wedding party" cards!
I had ordered paper samples from Paper and More, to find the perfect shade of lavender paper, as well as samples from LCI Paper for the perfect textured green card stock. Using these samples, I double sided printed two cards per sheet on the lavender 65lb card stock. I tried to use chocolate brown ink, but it turned out a dark purple when printed. I then cut the one sheet of green card stock into 7 strips, and glued them around the cards as thin belly bands, tying brown satin ribbon over the green for an extra pop of texture.
I did this all very on-the-fly, without actually sitting down and plotting out my exact measurements and steps before implementing. I won't be doing that for bigger projects, but as just a quick and small paper project, I did pretty ok without a plan of action laid out.
Here is the final result, the wedding party invite with the belly band on: The invite with the belly band off:
 Invite open:
 (All pics taken by me)
The cost:
4 sheets of orchid paper - $2.00 ($0.50 for each sample)
7 A7 envelopes in orchid - $3.50 ($0.50 for each sample)
1 sheet of green card stock - $1.00 (sample price)
About 6.5 feet of ribbon - $1.99 (3 yards for $1.99)
= ~$1.21 each + stamp
Not bad for making invites out of paper samples!
Did you have trouble picking who would be in your wedding party? And once you picked, did you send them a cute card?
In my last post I left you back at ground zero, with both Mr. Cola and I not on the same page with what we wanted in a wedding location, and all my pre-screened beautiful winery locations rejected because the price tags were just too high.
So I began researching locations yet again, looking at every single posting on theknot.com and herecomestheguide.com, and any other sites I could find, looking for something that met most of our criteria. Mr. Cola wanted something more causal and laid back than the wineries I'd liked so much, and I wanted something with an outdoor ceremony and dinner location, preferably with a view or beautiful surroundings. And it all had to be for under about $5500. Believe me, this is a tall order in the Bay Area!
So after a week or two of research and reaching out to site managers for pricing info, I'd found two locations that could be contenders. The Mountain Terrace in Woodside:
 {Source}
The Mountain Terrace was only $4100 for the rental with the on site ceremony fee and had a great view of the bay through the redwood trees. It really reminded me of some of our favorite camping spots in Big Sur and at Big Basin Redwood State Park.
.....so from the title of this post (and my profile!), you can probably guess that TMT is the location we picked! But just for the record, I'll talk about the other contender, Bella Montagna, in San Jose:
 {Source}
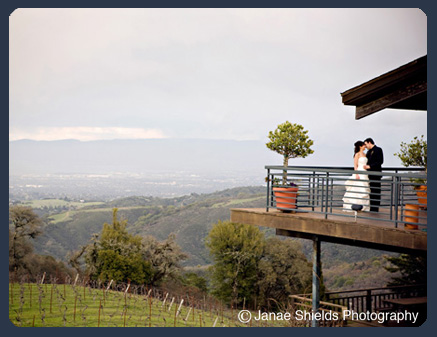
Bella Montagna had a great view, and was $5500 for the rental fee (but allowed BYBO, so the cost would have come close to TMT). However, we never even went and looked at Bella Montagna in person. Why, you ask? Well, sometimes you just know. We knew that The Mountain Terrace had everything we were looking for. And with that, I'll leave you with some pretty pictures I took on our visit:


(all pictures taken by me. I MUST have a picture of me swinging with my dress on!)
How many of you have gone with your gut feeling, and just known your wedding location was right for you?
Finding our venue was at first a struggle, but turned out to be one of the easiest wedding decisions we've had to make so far. It was probably around summer of 2007 that I started dreaming of wedding locations around Silicon Valley. Of course, we weren't engaged at that point, and hadn't discussed what we each wanted yet, but I was pretty set on a winery. There were so many beautiful ones, like Clos la Chance Winery in Morgan Hill:
 {Source}
And Byington Winery in Los Gatos:
 {Source}
As well as Thomas Fogarty Winery in Woodside:
 {Source}
However, I soon learned just how expensive the wineries in the Bay Area were! Not only were most in the $8k-9k range for just the rental fee, all required you buy only their (expensive) wine, and some didn't even allow hard liquor.
I did all this research back in 2007, and then tabled it for two years until we got engaged this past spring, at which time I sat down with Mr. Cola and discussed what we both wanted in our wedding. I wanted something elegant and chic, he wanted kegs and pizza. Hmmm. We were not exactly on the same page. I then busted out one of my many sample budgets, and we quickly agreed that the cost for my dream winery locations were just too high. Byington Winery was almost doable, budget-wise, but the ceremony location is up about 100 steps on a hill, which would be impossible for my dad and grandpa to climb, so that was cut from the possibilities too. We were back at ground zero.
Did budget constraints come into play when you were choosing your wedding location?
Most of you probably made the most obvious interpretation of my blog title, as in, getting married = hitching, and blog posts = post.
Well, that is true, but there's also another meaning! My parents were actually got married at a place called The Hitching Post Wedding Chapel in Coeur d'Alene Idaho, 36 years ago. It's been a long standing joke in my family about how my parents ran away to the uber classy Hitchin' Post in Idaho, to elope when my mom was 18 and my dad was 23. He wore a blue pantsuit and she wore a brown pantsuit, so very 70s. {Source}
If only I still lived up north, I wonder if I might have chosen the Hitching Post as our wedding location? It certainly would have been sentimental and meaningful....but I doubt I would have chosen it, it's just a little too cheesy for my tastes.
Would you ever consider picking your wedding location based on its meaning and your family history?
Welcome to my wedding blog! I'm so excited to share with you all our DIY wedding plans over the next year. I love being crafty and this wedding is basically just a big excuse for me to make things! Unlike many of the DIY blogs and sites out there, I'm not necessarily concerned with DIY'ing for the sake of saving money (although it is a plus!). We just don't want to have a cookie cutter wedding, so custom making many of the aspects will ensure our wedding is really personalized and truly "us."
 {Source}
A few of the projects that we'll be tackling: wedding party invites, custom stamps, save the dates and invitations, 4-tier card box, napkin rings, lots and lots of signs, a 6 foot tall cupcake stand, an arch, custom shoes, camera sleeves, favors.....and lots more!


 A close up of a single place setting & swatches:

 And the centerpiece for the cocktail tables:
 Next up, my four tier card box:
 And also favors mocked up (but we might be changing these to something else....):


 Well, that's about it for now! Next step, start implementing these designs (and so many more that I haven't shared!) into real life mock ups and then the final products. I think it will be so interesting to look back at this post over the coming months, to see how many of these mock ups actually evolve into real elements of our wedding, and how many morph into something different.


