skip to main |
skip to sidebar
It's been debated on the boards if having disposable table cameras is worth it anymore, especially since so many guests have digital cameras these days. I even wondered if this was a dated trend when I first considered including them. (Photo by Bridesmaid H)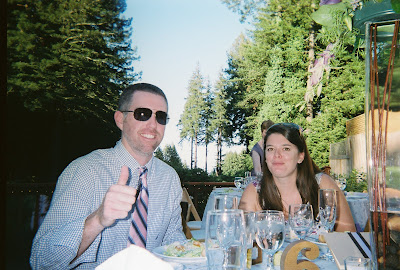


 Our first dance and the venue at sundown were captured:


 We got to see guests enjoying their LED luminary escort cards:
 And even better, we got to see Mr. Cola's co-workers figuring out how to hack the circuit boards in the escort cards, to change the LED colors:

 We got to see our cupcake tower and other details as our guests did:


 And we definitely got some great candids:


 Of course, we did get our share of some pretty bad photos, with people's heads cut off, and also some really random ones:
 But all in all, I'm really glad we invested in the disposable table cameras. Only about 10% of our guests actually uploaded photos to our sharing site (even though we put little business cards in our thank you notes, reminding people to please share their photos), so this gave us a whole lot of extra pictures for very little effort.Now it's time for you to weigh in! Will you be having disposable cameras on your reception tables, or do you not think they're worth it these days? Newlyweds, if you did have disposable cameras, was it worth the expense for the photos you got back?
Miss any wedding week details? Catch up here:
- I packed an emergency bag that saved my dress- We had a crazy 4 days prepping for house guests and stuffing favors- Shopping for a ton of wedding flowers to arrange ourselves- Mr. Cola drinks a 40 and I have a night out on the town for our low-key bach parties- A day of DIY'ing flower arrangements- I kicked off our official recaps with my #1 wedding tip
- We began the weekend festivities with a sunset cruise for our wedding party
- We rehearsed our quick and easy ceremony
- I panicked, but we got our rehearsal dinner decorations set up just in time
- Our families met for the first time at our rehearsal dinner under the trees- What went wrong on our wedding day, and my tips for future brides
- My bridesmaids and I got our hair and makeup done in the hotel suite
- I put on my wedding dress and became a bride
- The guys watched the World Cup, then got ready in 10 minutes
- Traffic delayed our decorations getting to the venue, and I almost ruined our first look
- We got to see each other for the first time on our wedding day at our first look
- We took some time for bride and groom pictures in the park
- I gave you a behind the scenes look at our family, friends and DOC setting up our venue
- Arriving at our venue and getting ready for the ceremony to start
- Everyone walked down the aisle
- Excerpts from our ceremony, and reading the vows we wrote for each other
- I interrupted our officiant, we exchanged rings, and with a kiss we were officially married!
- Wedding party and family portraits, and my thoughts on missing pictures
- Our guests enjoyed cocktail hour while we took a few more photos
- Everyone ate a delicious dinner, and our siblings gave beautiful toasts
- We didn't practice, but we had a very special and wonderful first dance as husband and wife
(Unless otherwise noted, all photos in this post were taken by the very talented photographers of Shoot Me Now Photography)
Since so, so many people asked me for the template to my “Old School” Disposable Table Camera Sleeves (original post here), I've decided to share!

Keep in mind that this will only fit the camera I used, if you have different cameras, just follow along the tutorial from the link above to create your own template. I used Fujifilm QuickSnap 400 Speed Single Use Cameras with Flash, like these.
I've uploaded both sides of the template here in the DIY section of Weddingbee for you to download (Illustrator CS files). One file is the outside of the sleeve, where you will place your graphics, then delete the red outline of the sleeve and run it through your printer (make sure you don't reduce to fit printer margins when printing). The other file is the inside of the sleeve, just flip your paper over after printing your graphics on it, and print out the red outline of the sleeve on the backside. You can then use it as a guide to cut out the sleeve, and the red outline will not be visible from the outside. It will also help if you save your original camera sleeve that you'll take off your camera, so you can look at it and have a better feel of where to place your graphics, and how to cut and fold your custom sleeve.
Here is a preview of what the templates will look like when you download them:

 Have fun designing your own custom table camera sleeves!
So, I'm not sure if putting disposable cameras on the reception tables is a dated trend or not. I never hear about anyone doing them on blogs anymore, but I still see the cheesy wedding decorated ones for sale online everywhere. Well, either way, I decided I wanted to do them! I'm also planning to ask everyone to upload their digital pictures for us, but I think enough of my family members still don't have digital cameras to warrant the disposable ones on the table. Plus, I've had some fun with them myself at weddings, and I'm hoping to get some interesting candids that we wouldn't get otherwise.
After making this decision though, I simply couldn't find a disposable wedding camera that I liked, and I didn't want to put ugly undecorated ones on my tables. So it was time for another DIY template!
I started by buying a 10 pack from Amazon of Fuji 400 speed cameras with the built in flash, for $34.75 before shipping, plus 1 extra camera from the drug store. We're hoping to have a total of 12 tables, and the head table doesn't need one, so 11 cameras should be just fine. Worst case we'll have 13 tables, and then the parent's table can sacrifice their camera!

After receiving my cameras, I carefully took the green cardboard sleeve off the camera, and taped it to my cutting mat, so I could photograph it with a reference to its dimensions.

Next, I opened the photo with Illustrator and resized it until it was to scale, with the inches on my cutting mat lined up with the ruler bar in the program, as shown in the purple circle below. You should be able to do this in Word, or any program that has a ruler bar.

I then traced the outline of the camera sleeve on top of the picture in Illustrator (see red lines below).

Next, I deleted the picture from Illustrator, leaving only the red outline of the sleeve, inserted my graphics, and printed the graphics on the front and the outline on the back (and be sure to make sure the printer doesn't scale it when you print, so the sleeve is the exact size you traced it).

I then just cut out the outline of the sleeve with scissors and used my x-acto knife to cut out the shapes in the middle.


Yup, I used the sexy wood grain paper for these too! I wanted to add another element in wood to the tables, and these cameras were the perfect opportunity. Then all that was left to do was glue them to the naked cameras. I used hair bands to hold them while they dried, which seemed to work well.


So there you have it, an easy way to make a template for custom camera sleeves, that will work with any type of disposable camera!
Will you be putting disposable cameras on your reception tables?

 (Photo by Bridesmaid H)




 Posts
Posts