Sunday, August 21, 2011

Weddingbee: Snapshot Sundays

Mr. and Mrs. Cola


City: Woodside, CA (San Francisco Bay area)
Venue: The Mountain Terrace
Wedding Date: June 12, 2010
Bridal Gown Designer: Sophia Tolli "Alexandria" in Spun Gold

Florist: All arrangements were done my my mother, aunt and I
Photographer: Shoot Me Now Photography, Pacifica, CA
Music: Ceremony acoustic guitar played by a friend, reception iPod/laptop music monitored by friends  
Transportation: Peninsula Tour (Guest Charter Bus), Limo Bee (Bride and Groom's Limo)
Stationery: All paper products purchased from LCI Paper and Paper and More (DIY)
Cupcakes: Sibby's Cupcakery, San Mateo, CA
Catering: Venue catered (The Mountain Terrace)
Coordination: Sara Gorski
Hair and Makeup: Aimee Lam, San Francisco Bay area
Bridesmaids’ Dresses: Calvin Klein, from Nordstrom
Spouse’s attire: Charcoal grey suit, from Sears
Menswear: Charcoal grey suits, from Sears
Honeymoon: Kauai Love Shack, Kauai (private house rental) and Sheraton Princess Kaiulani, Ohau    Favors: Choice of cookies from the San Francisco Cookie Company, white cheddar popcorn from Thatcher’s Gourmet Popcorn, or Ghiradelli Chocolate Squares

Color Scheme and Theme: Alfresco Romance Under the Redwoods, featuring lavender, sage, butter cream and chocolate.


{All photos by Shoot Me Now Photography}

Thanks for letting me share some of my favorite wedding photos with you one more time! It was so nice to have an excuse to look through them again, since a little over a year after our wedding, I definitely don't spend hours drooling over our photos like I did right after we got them back from our photographer. ;)

I had so much fun looking back at the details from our wedding, I think I'm finally inspired now to do something with all of our leftover paper from making our invitations. I think I just realized how much I miss crafting with paper! To check out some more of my DIY wedding paper projects, or any additional details from our wedding, feel free to check out my Weddingbee Wiki and all of my archives, or you can find me these days over here.

And you can see the rest of the Snapshot Sundays posts here.


Thursday, July 21, 2011

Shadow Boxes: A Little Snapshot of Our Wedding

A long, long time ago, I put "make wedding shadow boxes" on my post-wedding to do list.

Well, better late than never I guess, because I finally got around to it!

Earlier this summer I had purchased some cheap shadow box frames, which I had a location for on a specific wall, but nothing to put in them. It was the perfect opportunity to find some mementos from our wedding that I had stashed away last year.

So I dug through my old boxes of wedding stuff, and printed out some photos to make a collage for the shadow boxes. Unfortunately, I couldn't find my husband's dried boutineer, but I'm sure it will turn up eventually. I distinctly remember hiding it in some kind of little box or something, somewhere "safe" where it wouldn't get damaged in our cross country move, but I guess it was such a good hiding place that now I can't remember where I put it!

Want to see the finished (but not yet hung) shadow boxes? :)

(Tip: After you figure out how you want to display your shadow box items, take a photo of the layout before you glue/tape everything into place. It makes a good reference, and is a lot easier than trying to remember the exact layout you liked after picking things up to apply the glue and tape.)

And how about some close ups?


Below shows one of my "something old" items, a little bear I gave my grandma when I was 3 years old, that she carried around with her in her purse for 20 years, until my grandpa gave it back to me after she passed away. Also, one of my Cola rehearsal bouquet flowers, as a nod to my time writing here. And in the far bottom right, some fabric from the napkin rings I made.


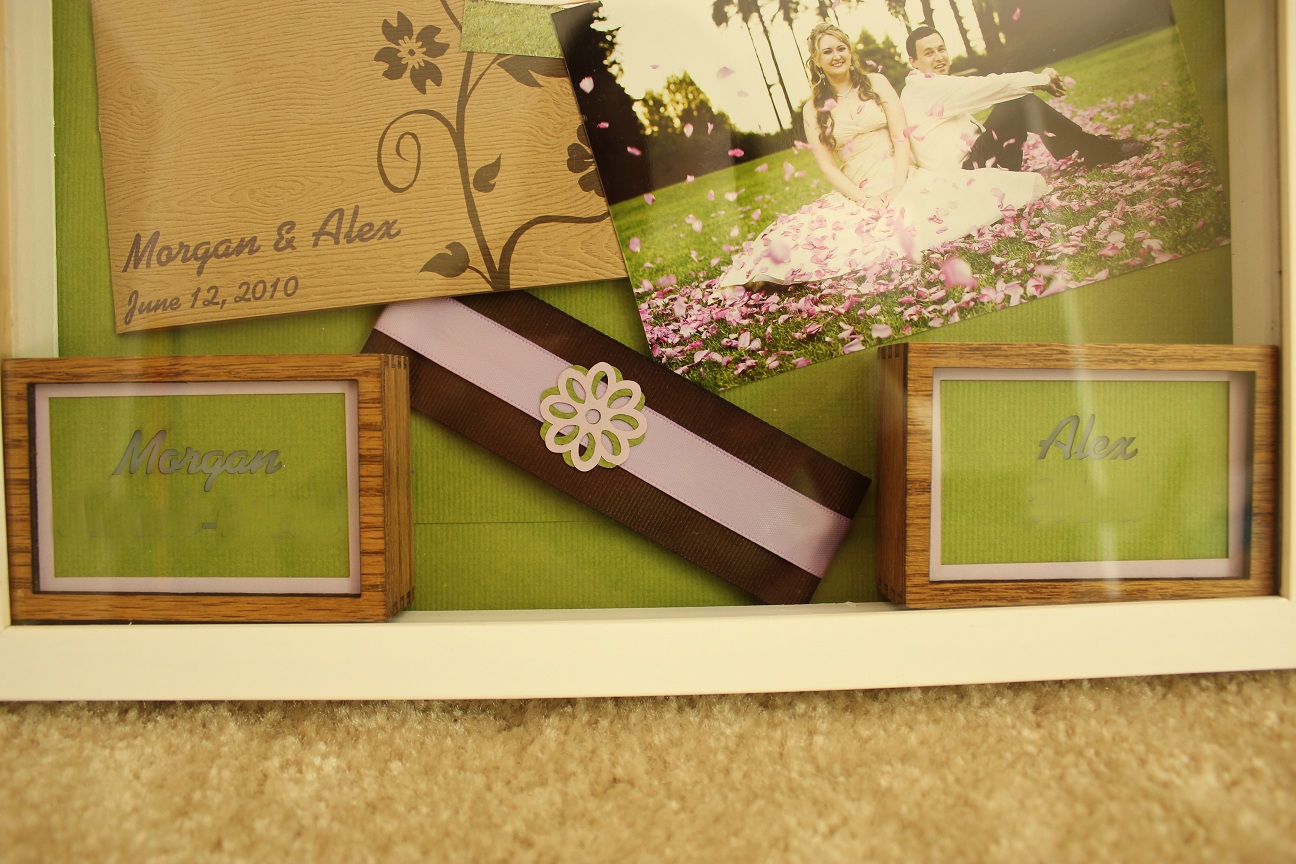
A close up of our laser-cut invitations. So much work, with all the cutting, folding (I even hand made the pocketfolds!), and gluing, but I'm still so proud of them.


I had to include a photo of our six foot tall cupcake tower that my husband and I built together, since that was another one of my favorite wedding projects. And also one of the rocks from our "wishing stone" guestbook, signed by my parents. My mom even drew a little flower on it, just like from our invitations.


And now for a closer look at the second shadow box.


Our programs, and a few leftover flowers that I had after I turned the cuffs from my DIY wedding shoes into a clutch.


One of the magnets from our save the dates, and of course, a photo of our first kiss as husband and wife!


And finally, the belly band from our invitations, and our LED luminary escort cards, another favorite wedding project of mine (partly because my husband did most of the work, haha!)


It's just too bad I can't leave the batteries turned on all the time, to glow like they did at our wedding.

(Above photo, and photos used in the shadow boxes by Shoot Me Now Photography)

I can't wait to get some Command picture hanging hooks so I can put these little snapshots of our wedding up in our hallway. Can you believe that these will be the first wedding photos we'll have put up on our walls, over a year later!

Will you be saving any mementos from your wedding, to showcase them later? And how long did it take you after getting married to hang or display your wedding photos?

Tuesday, July 12, 2011

My Rehearsal Dinner Dress: Revamped One Year Later!

Alright, well really it's 13 months later, since I checked in last month with our one year anniversary update!

But, now that our first wedding anniversary has come and gone, I've started thinking again about what to do with some of our leftover wedding items.

I still haven't gotten around to selling or giving away a few extra decor items and still haven't cleaned any of my wedding event dresses yet. Partly because of laziness, partly because I hate getting rid of stuff, and partly because I ran out of time to take care of these things before our big move to the east coast, and they're still packed away.

But recently I did dig out my rehearsal dinner dress from BCBG, because I wanted to try to dye it so I can re-wear it, instead of selling it to someone. I knew that if it was a color other than white, I would have a lot more use for it, and since I really liked the silk floral applique detailing, I figured it was worth a shot.

Here's a look at my rehearsal dress, so you get an idea of what I'm talking about (the purple sash is not attached):


And a close up view of the fabric:


The problem was, the top floral layer of the dress is 100% silk and the under layer is 100% polyester. Googling high and low, time and time again I read that there wasn't a fabric dye that would work on both silk and polyester.

I briefly considered taking apart the seams to separate the layers of the dress, dying them separately, then sewing them back together, but that just seemed like too much work.

I kept Googling, reading fabric dying forums, until I found a mention of what is called iDye (for natural fabrics like silk) and iDye Poly (for synthetic fabrics like polyester), which can be mixed together to dye poly-blend fabrics). So I ordered some dye, after polling friends on what color I should pick, and crossed my fingers that it would work on my two layer dress too.


Picking the dye color wasn't easy, since they have so many natural dye colors to choose from, but I was inspired by a bright yellow dress that at Cat Deeley wore a few weeks ago on So You Think You Can Dance. Plus, I decided it was a safer bet, since I had to use both a natural dye and a polyester dye, and the polyester colors were a bit more limited. So I went with yellow, hoping it would turn out something like this:

{Photo of my TV playing So You Think You Can Dance}

I bet you're all dyeing (ha ha) to see how the process worked, right? :)

Well, I pretty much just followed the instructions on the packaging for dying a poly/natural blend fabric, but I took pictures along the way to properly demonstrate!

First, fill a metal pot or bowl with just enough water for your dress to move freely, and make sure the fabric gets completely wet all the way through (to make sure the dye soaks in evenly).


Then, take the dress out, place your bowl on the stove and turn it on to high. Add both packets of dye and the color intensifier that comes with the poly dye to the water and stir until it's completely dissolved.


I stirred for about 5 minutes as the water was heating up, but there were still a couple of dark flakes of dye that wouldn't dissolve, so I fished them out with a spoon and dumped them on a paper towel (be sure to wash your spoon quickly afterward too).


Once your water is boiling and the dye is dissolved, reduce your heat to medium high and add either 1 cup of salt (for cotton blends) or 1/3rd cup of vinegar for silk. Make sure you move the fabric to the side so you're not pouring directly on it, and then stir, stir, stir!


It says it takes anywhere from a half hour to an hour for the dye to work, and for best results, stir frequently. I'd already poured myself a glass of wine before I put my dress in the dye, and had a bar stool nearby to sit on, so I just set my timer for a half hour, had a glass of wine, and didn't stop stirring the whole time.


But with still a few minutes on the timer, I held up my dress for a look, and I thought it was about dark enough.


The instructions said to gradually cool the fabric, so with 8 minutes left, I removed the bowl from the heat and continued to stir it constantly until the timer went off.


Then I ran warm water over the dress, slowly turning the temperature cooler and cooler until it was about room temperature.


And after hand washing it with some Woolite, and all of the dye was rinsed out, I squeeze/roll dried it as best I could between two towels and hung it in my bathroom to hang dry.


The next day my dress was dry and a little lighter in color.


I can't tell you how happy I am that this ended up working! I was a bit nervous to potentially ruin this rather expensive BCBG dress, but as much as I LOVED it in white, I knew I'd never wear it again unless I dyed it. And now I can't wait for an excuse to put it to use!

But until then, I took a few photos of it on in my backyard, so you can get the full effect of how the color looks in natural light. With neutral accessories:


And with black accessories (my favorite, because it's bee colors!):


I'd also really love to pair the dress with some medium grey pumps and a grey belt, although I don't own a grey belt. But yellow + grey is an awesome color combo that I think would look great here too!

And while I'm at it, here are a couple of close up photos of the fabric.


LOVE!

However, if you're thinking of doing something similar, let me interject a couple of words of caution. First, my dress did shrink a little. Which I was sort of expecting, since it's supposed to be a dry clean only dress. But it wasn't a tight fitting dress to begin with, so I thought it would be alright, and it was. But just something to keep in mind if you're thinking about dying something yourself!

Secondly, you may have noticed that the bottom layer of the dress (the polyester layer) came out lighter than it looked like it would when I was boiling it in the dye bath. They say that it's a risk you run; that not all polyesters take the dye, or take it in different intensities, and there's really no way to know unless you try it. I actually really like the look of it on my dress, but it's also something to keep in mind if you're dying a poly-blend fabric. I didn't want the silk layer to end up too dark, since it looked like it was headed toward orange in the dye bath, so I took the dress out early. But if you're dying polyester, or a poly-blend, you might want to leave it in longer. I really don't know if the color of my silk layer would have stopped getting more intense at some point or not, and I wasn't willing to find out, but I probably would have let it go a bit longer if I'd been working with a blended fabric, to avoid a splotchy look. Just another thing to consider!


And finally, if you're planning on using the pot or bowl you used to boil your fabric in again, be prepared for a lot of scrubbing. I ended up using Goo-Gone to remove the last of the film on my bowl, and then put it through the dishwasher several times. And I threw away the old wooden spoon I'd used to stir the dye-bath--it was bright yellow, and I didn't plan on it being salvageable.


But other than that, everything went according to plan and turned out great. The hardest part really was just taking the plunge, and putting my dress in the bowl of dye!

Have you ever tried to dye fabric? And are you planning to revamp or reuse any of your dresses from your wedding-events?

(All pictures in this post are personal photos)

Sunday, June 12, 2011

My Favorite Part About The First Year Of Marriage: Togetherness

Well hello there hive!

Remember me?

{Photo by Shoot Me Now Photography}

No? Well, I was that bee who got married last June and wrote about how to pee in your wedding dress without needing help and who's fiance designed LED luminary escort cards and built a 6 foot tall cupcake tower. Or if you're curious for a quick glimpse of what our wedding was all about, check out my two details recaps here and here, or my wiki.

I know it's been a while since I blogged here, and there's a whole new group of brides reading now (congrats on your engagements, by the way!). But our one year anniversary is today, and so I thought I would drop by and give you all a little update on our first year of marriage.

First of all, married life is pretty awesome!


We've been seriously having a blast over the past year, and as much as I LOVED planning our wedding during our 15 month engagement, being married is about a thousand times better!

Now that we're not busy DIYing and crafting and planning 24/7, we have so much time for just us. And let me tell you guys, it's pretty refreshing. There actually is life after the wedding is over, and there is nothing better than spending time making plans for the rest of your lives together, and not just plans for a wedding day!


 {Personal photo of us out enjoying life at a friend's party, with San Francisco in the background.}

So what plans have we been making for our future? Well, after we'd had a couple of months to recover from all the wedding festivities and our honeymoon, we sat down and took a hard look at our goals, and how soon we could achieve them. Namely, when could we afford to buy a house. And living in the San Francisco area, after crunching some numbers, well, it just wasn't going to happen any time soon. So together, we made a plan to change our lives for the better, financially speaking, and we set out to find somewhere more affordable to live.

We narrowed it down to either Denver, CO or Raleigh-Durham, NC for various reasons. And while this move pretty much consumed our lives for the last 9 months or so, it has been one of the most enjoyable times of my life. Working on this with my husband, to map out exactly what we wanted in a new city, scoping out said cities together, and working out the logistics of a huge move together was (and I almost hate to admit this, because I was crazy-in-love with all things weddings) way more enjoyable than planning our wedding mostly by myself, because Mr. Cola wasn't very interested.

It was the togetherness of it all that made me happy. And still does!

{Personal photo of us together in the Rocky Mountains, while scoping out Denver as a possible city to move to.}

And that's the lesson I've learned most from our first year of marriage: there's nothing better than being a united front and doing things together as husband and wife.

Sure, we do things independently like meeting up with friends, always have, always will. But when it comes to big life decisions (or even just what brands to get at the grocery store), I love making the decision together with my husband. Pre-marriage I always considered Mr. Cola in my decision making and planning, but now, now we get to do that together. Maybe it's the logical, planner in me (I think making lists is fun!), but hashing out pros and cons, having in-depth conversations and coming up with the best solution together has been one of the things I've enjoyed most about our first year together as a married couple.

Yep, we're partners in every sense of the word, and I'm loving it!


{Personal photos from our Florida vacation in March with my in-laws.}

And we really worked our partnership skills about two months ago when we made a cross country move to Raleigh, NC, to our new home. Four days in a car with our three cats and one gecko, driving 2,800 miles, while we crossed our fingers that our moving company would deliver all our belongings unharmed was pretty stressful. But we got through it in one piece, and we got through it together.

So now we're living on the other side of the country, and finally starting to get settled in and checking out our new state (a state I'd only been to twice before we moved to it!). But don't think we're going to just lie down and stop making plans now that we've completed this big change!

 {Haha, get it? A picture by Shoot Me Now Photography of me lying down, when I just said I'm not going to lie down....yeah, I'm not great with the puns!}

Heck no, we're still making big plans, and hopefully by next spring we'll be purchasing our first house together, after we learn the area a little better. And until then, you know I've been decorating and DIYing stuff around our new rental house, which I've been writing about here on my personal blog.

So that's my little update on our first year of marriage. Being married = awesome sauce!

And you know what else? I've held true to every promise I made to Mr. Cola in the vows I wrote and read to him one year ago today:
"I will try every single day to make you happy. I will listen when you need to vent, comfort you when you've had a rough day, and always be on your side, no matter what.

I vow to spend the rest of my life with you, laughing, sharing, building memories, and thoroughly enjoying whatever adventures may come our way. I vow to build the best life together with you that we can, filled with passion and achievements, and be fully devoted to the love we share.

And I promise to love you with my whole heart, forever."

Happy one year anniversary to all the June 2010 bees out there, and here's to many, many more years of happiness together as a married couple!

XOXO,

Mrs. Cola

"Nothing could be as exciting as we have now, unless it is what we will have together in the future."
{Photo by Shoot Me Now Photography, quote source unknown, via LovingYou.com}


Tuesday, January 18, 2011

A Fond Farewell

Well, the time has finally come.

Time to say goodbye to you all. Well, not really goodbye, since I’m sure I’ll pop back in every once in a while. But my time regularly posting about my wedding on this blog has sadly drawn to an end.


To all of my readers, I want to thank you for everything.

For laughing with me over my peeing in a wedding dress illustrations. For coming to my rescue with suggestions when we were lied to by a vendor. For writing nice things about my husband's hard work on our luminary escort cards, giving him a little feel of the wonderful community that us bloggers have formed. For making me feel better about my disappointing post wedding chop. For reading any of my many tutorials, that I so enjoyed putting together for you all. And for following my detailed wedding recaps (all 37 of them!), and allowing me to share how all the little details came together on our big day.

For all of your support, your encouraging comments when I was in doubt, and your alternate suggestions when I needed them, I thank you. Without you, our wedding wouldn’t have been what it was--one of the most special, fondly remembered days of our life so far. I wrote here for about a year an a half, sharing every detail of our wedding planning journey, which wasn't always easy, but without the support, kind words, and excited sharing of similar stories and situations in the comments from you all, I would have had no reason to write.

I truly hope that I've been able to help at least a few of you with your own wedding planning journey, and I've organized my online Wiki with links to most of my archives, if you
are ever looking for a quick reference.


It’s been a quick 7+ months since I married my best friend last June in a redwood-lined meadow overlooking the San Francisco bay. I had no idea how quickly time would pass after our wedding, but it did! And things won’t be slowing down for us anytime soon, we’ve got lots of upcoming travel plans, I’m working on making some items to open an etsy shop (which I hope to have ready by our one year anniversary), I’m trying to learn how to cook, we’re in the middle of de-cluttering our lives, and I’m dreaming up new projects for our house. You can read about it all over at my newlywed blog, The Handcrafted Life, if you like. I'm doing a gift card giveaway through Thursday night, so check it out!


Farewell, for now.

With lots of love,


Morgan