skip to main |
skip to sidebar
I've mentioned a couple times before that we're having several "satellite parties" surrounding our wedding: the Wedding Party Welcome Event, Rehearsal Dinner, After Party, and Sunday Luncheon, but I haven't gone into much detail on any of these parties, except the rehearsal dinner.
So I'll start with the first one, the Thursday night get together for our wedding party, DJ/musician and officiant. Our officiant friend (and his girlfriend) are local, but the rest of our wedding party is spread across three different states, so we wanted to do something special for them to welcome them to town, and to thank them for standing up beside us on our big day. Annnnddd, it also might be a little bit of a bribe for some set up help on the afternoon of the wedding ;) .
Our first thought had been to rent a box at a San Francisco Giants game, but since they're not in town the Thursday before our wedding, instead we're going to take everyone on a sunset cruise on the San Francisco Bay, with Adventure Cat Sailing. 
 {Source}
The sunset cruise lasts an hour and a half, and we will be paying for 12 people, so we get the discounted rate of $40 per person, which includes two drinks.
A couple hours before the cruise, we plan to have everyone meet in our hotel suite (they're all staying there too), so we can give them their wedding party gifts, then head to Zorbas Pizza in downtown San Mateo, where we'll treat them to an early dinner of pizza, beer and wine. Then we'll all ride the train up to the city (and yes, you can drink on the train!), take a quick cab ride to the pier, and be off on the cruise.
After the cruise is over we'll leave the rest of the night up to our friends, since at that point the paid for activities will have to come to an end. We definitely want to show everyone a good time, but paying for dinner, drinks, and the cruise for 12 people will exhaust our budget for this party. So depending on how much our wedding party wants to spend on their own drinks, we can either pub hop in San Francisco until the last train leaves at midnight, or else just head back to the hotel and have some drinks there for a lot less.
Are you doing anything special for or with your wedding party in the days leading up to your wedding?
Oh, sweet laser cutter, how do I love what you can do to paper products! But it wasn't meant to be, and our guests will never see these amazing pocketfold covers that were in my original invitations plans.

I've alluded to the fact that the invitations suite I spent the past week posting about wasn't my original design, so now that you've seen the final versions, I'll go into what I'd previously wanted to do.
It all started back in November, when I decided laser cutting an intricate design on pocketfolds was the end all, be all way to do our invitations. Mr. Cola spent some time doing some mock ups for me on the cutter, to gauge how much time it would actually take to implement my designs, but the news wasn't so good. The inside wood grain paper that you already saw us use took about 23 minutes to cut two, and my plans for the pocketfold took about 13 minutes each, plus another couple minutes to cut our names in the wood grain paper layer under the pocketfold cover.

Well, you can do the math as well as I can, with the designs I had my heart set on, we were looking at spending a HUGE amount of time laser cutting, not to mention all the printing, gluing and assembly of the rest of the invite elements. But you know what? I was fine with it. Who needs to have a life when you could be working on amazing wedding invitations, right? Mr. C warned me that if we went ahead with this plan, I would be the one babysitting the laser cutter, not him, and he claims he tried to talk me out of it (which I totally don't remember!), but I was already in the mindset that this was what we were doing.
Fast forward to mid January, and it was time to actually start working on the invites. Luckily it was the wood grain paper we started with, so I still did get one portion of the invites to have a laser cut aspect, because the rest of my dreams went down the drain. It took us about 20 hours one weekend, and 10 hours the following weekend to complete all the wood grain sheets, and it was at that point that Mr. Cola got really frustrated. While it was me who was running the laser cutter, doing the swap in/swap out for all the sheets, while we caught up on episodes of Lost on my laptop, he was getting really sick of spending so much time in his office.
We kind of had a blow up that night, and although it was probably pretty tame fight compared to what most people have, it threw me a bit. We NEVER fight, and invitations were not something I wanted to put our relationship in a bad place over. So on the way home from his office, I redesigned our invites in my mind, trying to keep as many of the elements as I could, but do away with the rest of the laser cutting, and came up with the final version I showed you all in my last post:

They were scaled back, but still very pretty, and we could still use the laser cut wood sheets, as well as all the green paper I'd already purchased for pocketfolds. And definitely worth it to avoid any more arguments, as well as a huge time saver. And probably the best part was that Mr. Cola agreed to let us have laser cut escort cards instead! (These escort cards have since taken a life of their own and now involve LED lights....but that's another post for another day.)
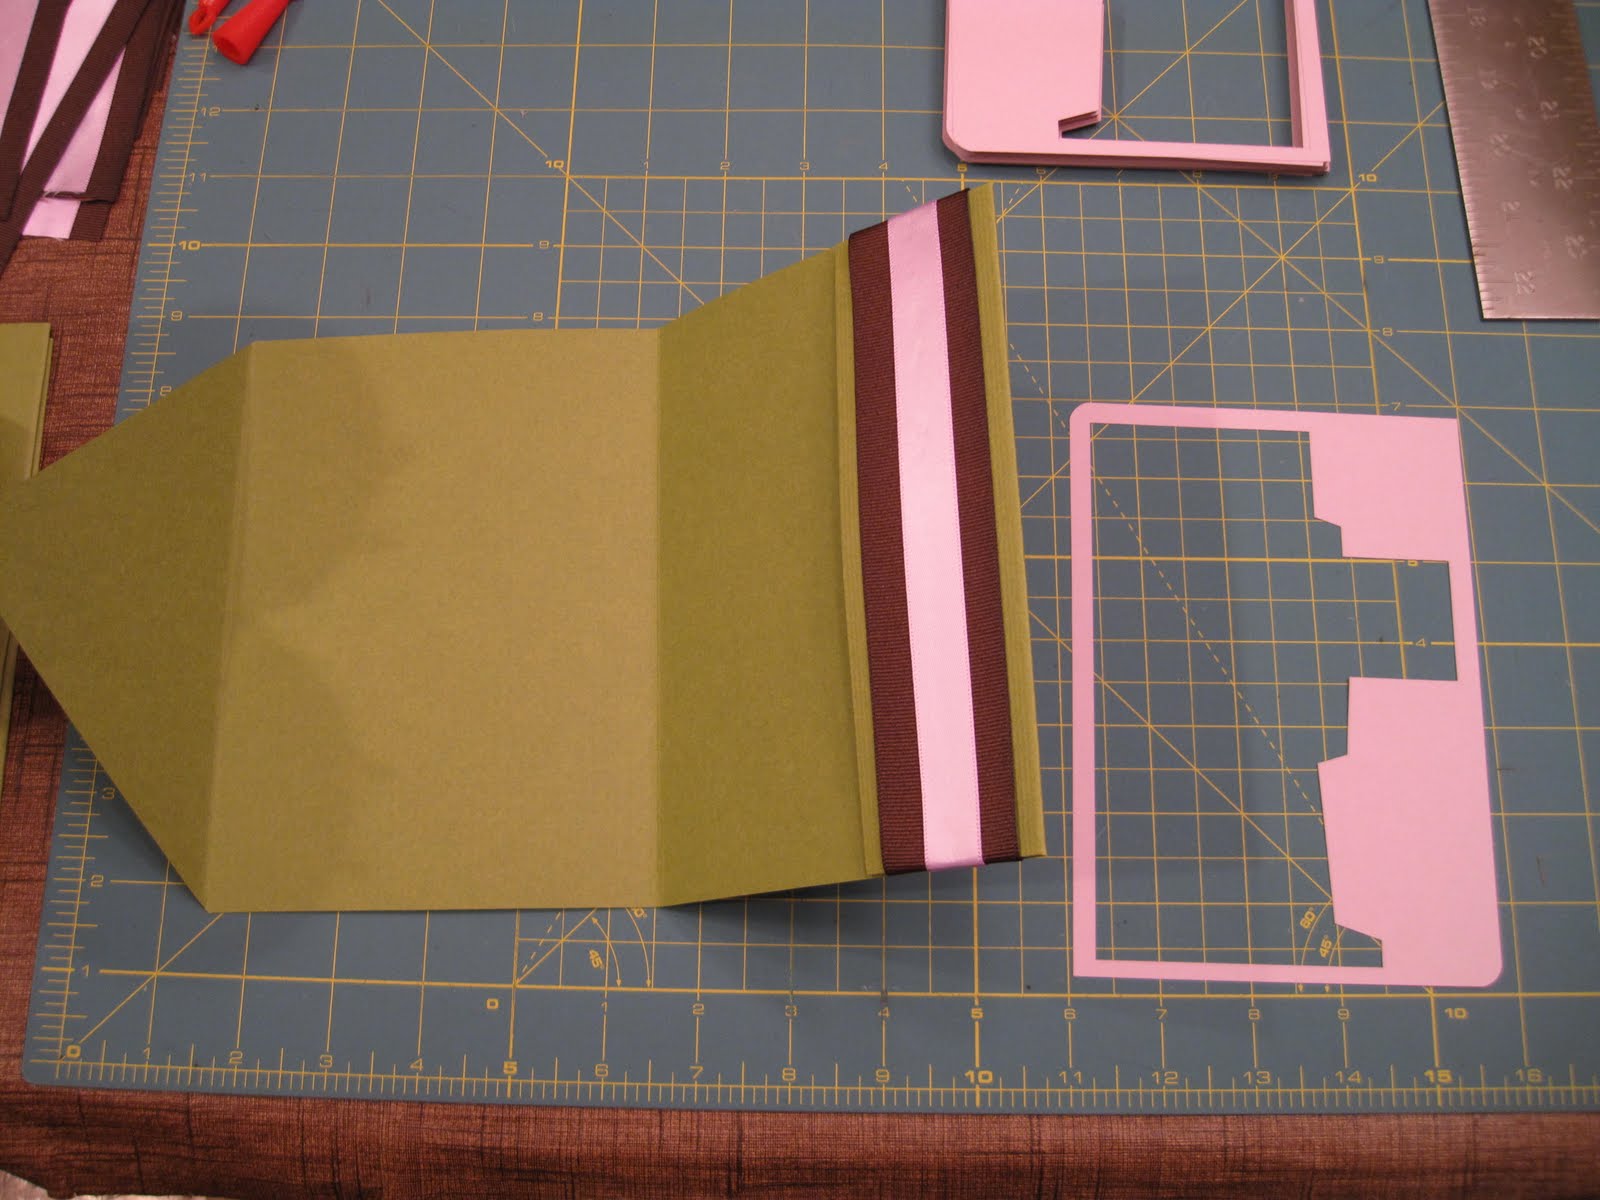
I still love my original pocketfold designs though, so wanted to share with you all what could have been. Laser cutters can do amazing things to paper if you have enough time! This is the mock up of the cover of the pocket fold, which would have had a ribbon belly band over our names.


And upon opening the first flap of the tri-fold, there were going to be three cut flowers, with the purple backing from the inserts showing through:


With the full cover design there would have been a place for the RSVP card and envelope on the inside, held in place with photo corners (instead of under the belly band on the back side as in our final version).

And this is a look at the pocketfold opened up, how it would have been positioned to laser cut it. Beautiful? Yes. Worth 13 minutes each, plus set up time, and an unhappy Mr. Cola? Not really....

I'm really glad I got to show you all the original design of our invitations, since I worked really hard on it! But I'm also glad that I waited a while, it gave me more time to put things into perspective, and let go of my slight bitterness about the change of plans. It was definitely a learning experience, if anything else: listen to Mr. Cola more closely when he tries to talk me out of something that's not going to make him happy. He almost always goes along with what I want, so if he's going to make a stink about something, I really should pay attention. And from now on, if he does try to talk me out of something, I'm just going to remember back to our stupid fight over invitations, and listen up!
Have you had a learning experience about your relationship that sprung from working on any of your wedding plans or projects?
After my last three posts on the making of the Cola invites, it's time to finally show off the finished product (along with what I imagine our guest's commentary will be)!
 "Ohhh, what a pretty envelope! What could be inside?"
 "Oh goodie, it's from Mr. and Miss Cola!"
 "Wow, this envelope is lined, what a fun surprise!"
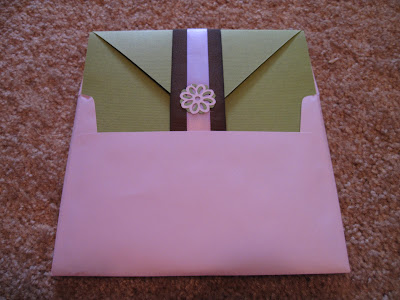 "Let's get this out of the envelope so we can see what's inside."
 "I just love ribbon belly bands!"
 "Yay, the RSVP card and envelope are on the back, I'll be sure to send this back right away!"
 "What a nice touch to find another flower on the pocketfold after removing the belly band."
 "And yet another flower inside the pocketfold flap, wow, I just love all the small touches!"
 "It's so beautiful when the pocketfold is opened, The Colas must really have put a lot of time into making these!"
 "What a cool, laser cut design, I've never seen that before!"

 "I must have a closer look at the amazing texture of wood grain paper, laser cut text and flowers!"
 "What informative, helpful inserts."
 "This is such a beautiful invitation suite, I think I'll frame it....right after I promptly fill out the RSVP card correctly and put it in the mail!"
Yeah, yeah, I know none of our guests will pay this close of attention to our invitations, or appreciate them as much as my fake commentary, but if they like them even half as much as I imagine, I'll be happy!
Now for a look at what these cost us. I already had a lot of the supplies we used, like the x-acto knife, printer and ink, corner and flower punches, etc, so won't be counting those in my total cost. I'm also only counting the cost of each sheet of paper used, since I definitely will use the leftovers elsewhere (click the spreadsheet for a larger view).
 I should also note that this total doesn't include the outer postage stamps (I'm getting them this week), or tax. But I'd still say that $406 is a pretty good price, compared to what they'd cost to buy, and especially considering that at my mom's count, there are 25 individual pieces that went into these invites (I'm pretty sure her count didn't include the outer stamps either). But it is certainly a good thing that I am considering the time Mr. Cola, my family and I spent working on these as free, or this price would be quite a bit higher. All in all, I estimate these probably took about 150 total hours to complete, including the 30 hours of laser cutting just the wood grain paper portion. And now you know why my recent blog posts have been light on the DIY--these took up a lot of my attention!
For anyone who is wondering, I got my green paper from here, cream paper from here, wood grain paper here, my purple paper and envelopes here, and the ribbon I used was from Michaels. And if you are really interested in doing your own laser cutting, and don't know someone with access to a machine, you might want to try Googling public workshops in your area. In the Bay Area we have a place called TechShop that will let you rent time on their machines.
Well, that concludes my posts on our wedding invitations that are going out this week. Next I'll finally show you all the pocketfolds that could have been, with the additional laser cutting I wanted, but that would have been to time consuming.
Were you relieved to send your invitations out? I'm not looking forward to the upcoming stress of missing RSVPs, but I'm sure glad mine are done!
The pocketfolds were done, and the laser cut invites and inserts were prepped--it was time to assemble everything!
And I'm very proud of myself that I finally relented and allowed my family to help with something! Delegation is really hard for me, but since I'd scaled back the invites to something other than my original design, I was sort of over them, and welcomed the help. So I gathered the supplies and headed to my parent's house, where my mom, two aunts and I assembled the invites, with even a little help from my dad and parent's dog.
 (Ok, Darby didn't really help, but he wanted to!)


My dad and mom hard at work. My dad only has use of one hand ever since his stroke, but he was able to put stamps on the RSVP envelopes. Sorry to anyone who gets upside down stamps though, he didn't realize it was a bell on the stamps at first (we opted to use forever stamps on the RSVP envelopes because we were doing them in advance and didn't want to run into any issues if the cost of stamps increased before they went out). He thought the forever stamp was a cup, so some were applied upside down! Oops!

One of my aunts was kind enough to seal the ends of the belly band ribbons from fraying, while another aunt glued. And my aunt was so smart to use a candle on the ribbon, which was much easier than repeatedly flicking a lighter like I did to seal the belly band ribbons I did for our STDs!

Next, it was time to glue the purple cardstock to the pocketfolds, that the laser cut wood grain paper would be glued on top of:


We then used a spray adhesive to attach the laser cut invitations. With all those gaps, the spray glue worked a lot better than Zip Dry paper glue, which is what I used for just about everything else.


And after that it was time for putting the inserts into the pocket, and gluing the belly band ribbons around the outside of the pocketfold.


We then had to tuck the RSVP card and envelope under the belly band, on the back of the pocketfold (still using the post-its with the number for each guest on our guest list, to keep everyone straight for when it was time to print the address labels).

But we weren't done yet, I of course had to line the envelopes too. It seems so common to line envelopes these days (at least on wedding blogs) that I couldn't NOT do it! Mr. Cola did some brain hurting math involving tangents or signs or something to figure out the precise angle the liners needed to be cut at, because even our rectangular envelope flaps angled in slightly. He then nicely cut them out one evening after work on the laser cutter, leaving me with perfectly sized liners in chocolate and lavender that went well with our lavender envelopes.


I won't go into too much detail on lining these, since I think there have been enough tutorials already: just basically insert the liner, use a ruler to make a straight crease where the flap folds down, glue, press down, and done!


After that, the only things left to do were to insert the invitation, and apply the address labels and outer stamps. But I'm going to wait until my next post to show off the fully finished invites, as well as do a cost breakdown!
Have you been able to delegate some of your wedding projects to friends or family?
Now that the pocketfolds were made, I needed to make inserts containing all the information for our guests.
First up was the main invite sheet, which would be glued inside the pocketfold. Enter the fun laser cutter at Mr. Cola's office! We spent about three full weekend days cutting these onto wood grain paper, since each page took about 23 minutes just to cut out two invites, plus time to set up the cutter for each page.
(A side note here. This laser cut portion was from my original, super awesome, but time consuming invitations design. It was after three 10 hour days of cutting these that Mr. Cola decided he'd had enough, so I scaled back the overall design to the one I'm showing you now. Don't worry though, I still plan to show off the really cool versions!)
The laser cutter in action:

For a design this intricate, the cutter doesn't always do a perfect job, so I still had to go back through each one and poke out the leftover pieces with my X-acto knife. You can see in this picture how the & symbol and an e are still left after cutting:

But after spending all that time, they turned out really neat, especially when they were all stacked together and you could peak through the cut outs:


I rounded the opposite corners on these and they were then ready to be glued into the pocketfolds:


My original plan had been to mount these laser cut sheets onto a layer of purple card stock, and then mount that to the green pocketfolds. However, since my purple paper is a lighter, lavender shade, there wasn't enough contrast with the wood paper to be able to clearly read the cut out text. So Mr. Cola begrudgingly let me use the laser cutter to cut the purple paper into a frame shape, so the green pocketfold would show through the text, but the flowers would be purple (and he admitted that this made a lot more sense to laser cut, since it only took about 30 seconds to cut out two, not 23 minutes). It would have taken me ages to hand cut these with my X-acto:


Next on the list were the three inserts that would go in the pocket and the RSVP cards. I printed these at home and took them to Kinko's to be cut for about $20, a huge time saver.

Rounding the opposite corners of all of these inserts was NOT fun, but I think it was worth it. I had a huge bruised indent on my thumb for almost a week from about 7 straight hours of corner rounding:

With the help of my mom and aunts, we glued all the cream printed inserts to the purple backing, and they were ready to be placed in the pocketfold. Here are some close shots of them so you can see the content I provided for our guests (you can click any of these for a larger view):


For the RSVP cards, we used a trick for countering missing RSVP names that several bees have used, the hidden number that corresponds to the guest's name on our guest list spreadsheet. This was also helpful to keep track of who got what RSVP card, since we have two versions: one for those only invited to the wedding and one for those invited to the rehearsal dinner, wedding and Sunday luncheon. I went low tech with it and just wrote the number in pen, on the back side, so when the cream and purple layers were glued together, the number is hidden, but I can always pull it apart if I need to see the number. We used cut up post it notes to keep track of the numbers once the RSVP cards were glued:


And with that, everything was ready for assembly!

Did you, or will you have more than one version of your RSVP card? How do you plan to keep track of your guests who may forget to write their name on the RSVPs?


 {Source}